Understanding how to effectively share access to your Google Analytics account is crucial for seamless collaboration and data-driven decision-making. In today’s digital landscape, having access to accurate and insightful data is more important than ever. With Google Analytics 4 (GA4), Google’s latest analytics platform, businesses can gain a deeper understanding of user behaviour and website performance. Whether you’re working with a team, collaborating with clients, or consulting with agencies, knowing how to share Google Analytics access is essential for maintaining transparency and efficiency.
How to Add a User to Google Analytics 4 (GA4)
Google Analytics 4 represents a significant advancement in analytics technology. With its robust set of tools and comprehensive data collection capabilities, GA4 allows businesses to track and analyze user interactions across multiple platforms and devices. This holistic view of user data helps in refining marketing strategies and enhancing user experience. One of the key features of GA4 is the ability to easily add new users to your account, enabling collaborative efforts and shared insights. This article will guide you through the process of adding a user to your GA4 property in a few straightforward steps
Step-by-Step Guide on How to Share Google Analytics Access
Let’s delve into the detailed process of sharing your GA4 access, ensuring each step is clear and easy to follow.
Step 1: Sign In to Your GA4 Account
Begin by logging into your Google Analytics account. It is crucial to ensure you have the necessary administrative rights, as only users with administrative access can add new users to the account. This step safeguards the integrity and security of your data by preventing unauthorized access.
Step 2: Navigate to the Admin Section
After logging in, select the GA4 property where you wish to add a user. To access the admin settings, click on the gear icon located at the bottom left of the screen. This opens the admin panel, where you manage all aspects of your GA4 property, from data settings to user access.

Step 3: Access Account or Property User Management
In the Admin section, you will encounter three columns: Account, Property, and View. Notably, GA4 properties do not include the “View” column, streamlining access management. Depending on your needs, you can add users at either the account or property level:
– For account-level access, click on “Account Access Management” in the Account column. This grants the user access to all properties under the account, providing a broad scope of data.
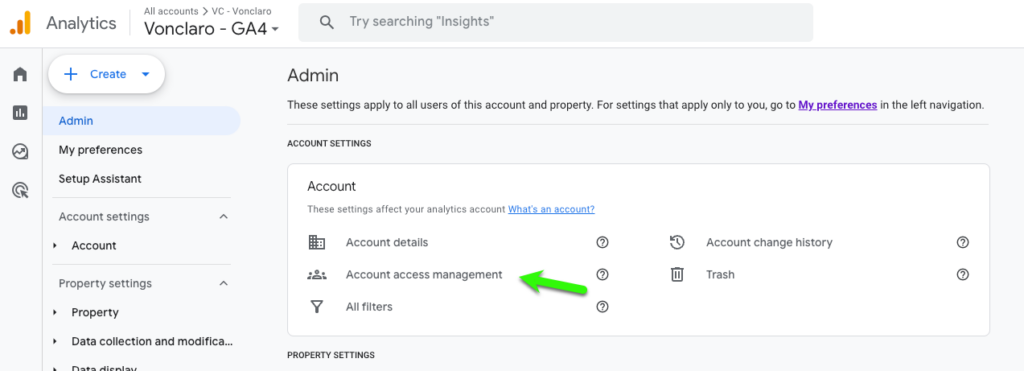
- For property-level access, select “Property Access Management” in the Property column. This option is ideal if you wish to limit a user’s access to specific properties, ensuring focused and relevant data exposure.

Step 4: Add a New User
On the User Management screen, click the blue “+” button located at the top right corner and select “Add users.” This step initiates the process of adding new team members or collaborators, enabling them to access and analyze the data you share.

Step 5: Enter User Details
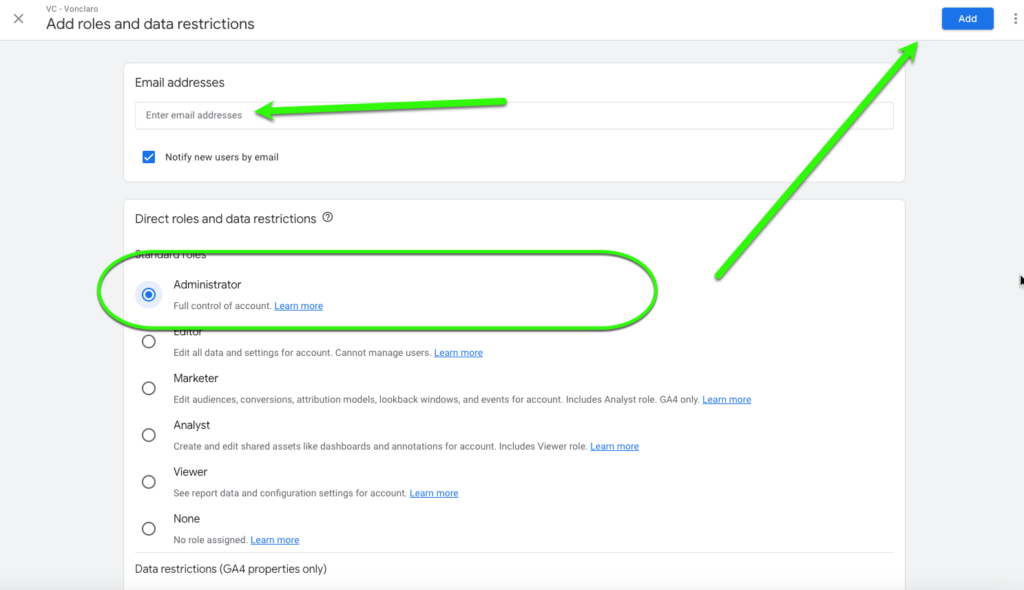
A new window will pop up where you can enter the email addresses of the users you wish to add. Make sure to input the correct emails to ensure the intended individuals receive access. You can add multiple email addresses at once if you’re onboarding several users simultaneously.
Step 6: Set Permissions
Setting the correct permissions is a critical step in controlling what each user can do within your GA4 account. GA4 offers several roles, each tailored to different levels of access and functionality:
– Viewer: Users with this role can view reports and settings but cannot make any changes. This is ideal for stakeholders who need access to data without altering it.
– Analyst: This role allows users to create and share assets but restricts them from modifying settings. It’s perfect for team members responsible for generating insights and reports.
– Editor: Editors have the ability to edit settings and assets, providing them with more control over the data and its presentation. This role is suitable for users who need to manage configurations and customize analytics views.- Admin: Admins have full control over the account, including managing user access and settings. This role is reserved for trusted individuals who require comprehensive access to all aspects of the GA4 property.
– Admin: Admins have full control over the account, including managing user access and settings. This role is reserved for trusted individuals who require comprehensive access to all aspects of the GA4 property.
You can also assign additional permissions, such as “Manage Users,” if the user needs the capability to add or modify other users. These permissions ensure that each collaborator can perform their designated tasks efficiently, without compromising the security and integrity of your analytics data.
Step 6b. Be sure to Double Check Permissions are correct
It’s essential to verify that permissions are correctly assigned to prevent any access issues.
A. If you’re adding an Admin, you must grant access a second time. Select the name of the person you have given permissions to and confirm their access level.

B. Scroll to the bottom and click on Administrator to ensure the correct role is selected.
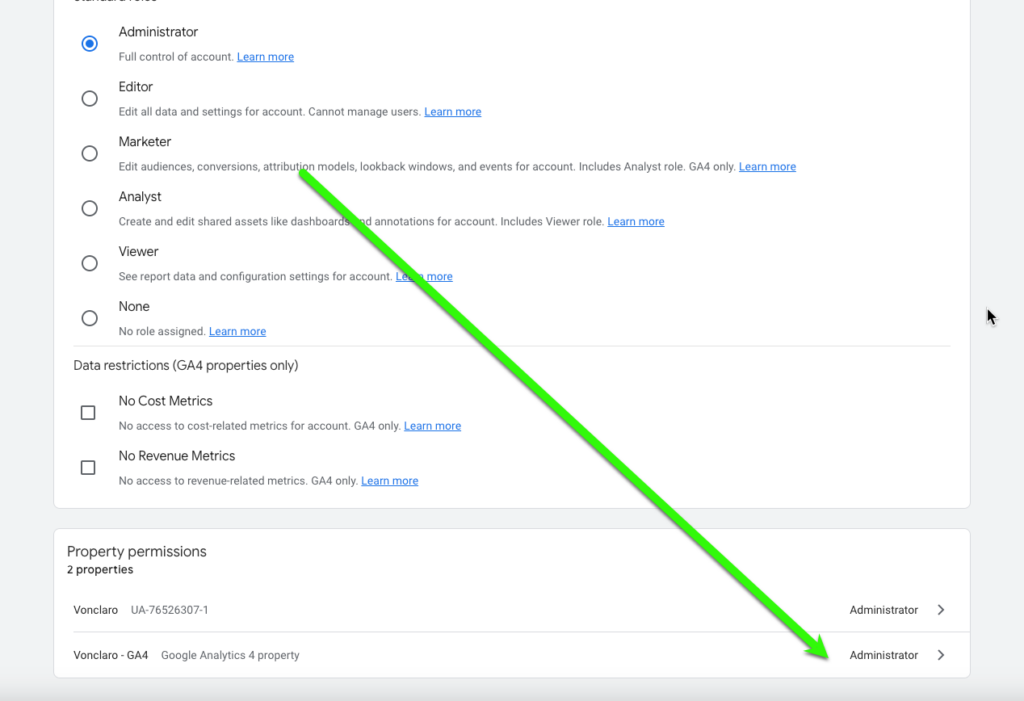
C. If “None” is selected, change it to “Administrator” to grant full access.
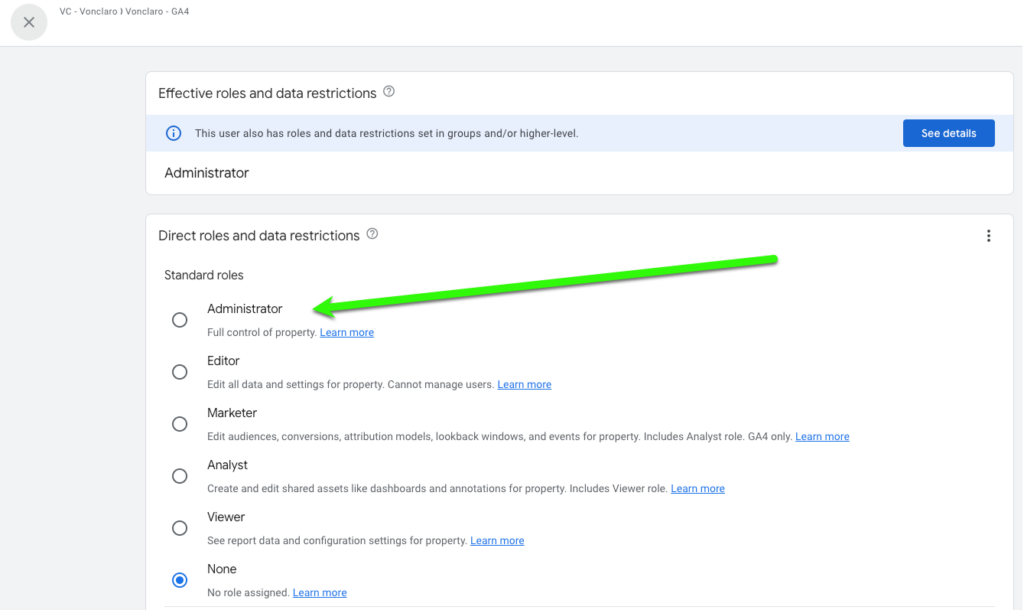
Following these steps guarantees that all permissions are accurately assigned, thereby facilitating seamless collaboration.
Step 7: Notify the User
After setting the permissions, click “Add.” The user will receive an email invitation to access your GA4 property. They must accept this invitation to gain access, ensuring that only authorized individuals are able to view and interact with your data.
Best Practices for User Permissions
Implementing best practices for user permissions helps maintain the security and efficiency of your analytics operations:
– Admin Permissions: Grant only to users who require comprehensive control over the account and property settings to prevent unauthorized changes.
– Editor Permissions: Suitable for users who need to manage configurations and create/edit assets, ensuring they can perform their roles without overstepping boundaries.
– Analyst Permissions: Ideal for users focused on data analysis and report creation, enabling them to handle data effectively without altering core settings.
– Viewer Permissions: Assign to users who only need to view reports and dashboards, ensuring they have access to essential data without the ability to make modifications.
By adhering to these practices, you can optimize the management of your GA4 property, safeguarding data integrity while promoting collaborative efforts.
Conclusion
Adding users to your GA4 property is a straightforward yet powerful process that fosters collaboration and enhances the effectiveness of your analytics efforts. By carefully assigning permissions, you ensure that each user has the necessary tools to contribute meaningfully to your data-driven initiatives while protecting your valuable insights.
Inviting users to your GA4 property is more than just sharing access; it’s about integrating diverse perspectives and expertise to drive better decision-making. With collective insights, teams can make informed, data-driven choices that enhance website performance and user engagement. Follow these steps to efficiently set up your team and start leveraging the full potential of your analytics data today.
Explore further on optimizing your digital strategies by reading about the importance of online feedback in “Why Google Reviews Matter” and the role of automation in “Mastering SEO: The Role of SEO Automation Tools in Your Strategy.”Assigning Google Tag Manager permissions.


